Visual Studio 2010 Publish Command from msbuild Command line

Seems like there a bunch of confusion about how to produce the “Publish” behavior provided by Visual Studio 2010 from msbuild 4 command line. The question I keep seeing over and over again is: How do I publsih the output of a web application with web.config tranformations included. This should get the job done:

msbuild solution.sln 
/p:Configuration=Release;DeployOnBuild=true;
DeployTarget=Package;_PackageTempDir=..\publish

ASP.NET MVC and Ruby on Rails Open Source Examples

Recently, I started hosting some “play” projects on GitHub. I have not had much time to write anything up on the details of these projects but I figured I would share the code anyway. First, the MyPhotos example is a jumping off point for a personal photo catalog. Second, the ShowOff project is a real world example of building a portfolio or gallery using ASP.NET MVC. Finally, John V. Peterson was kind enough to share his Nerd Dinner on Rails project. This is a port of the popular ASP.NET MVC real world example Nerd Dinner project.

tmpA6FB

You can find the git repositories for these projects via my account on GitHub.

I am hoping to walk through these projects in future posts. I have some down time due to a recent surgery. Depending on how I feel day to day, I will be working on these upcoming posts to pass the time.

ASP.NET MVC Helper – Dynamic Forms based on Model

Recently, I was working with a fairly complex data model that required a simple input form. Being the lazy programmer I am, I did not feel like crunching out the HTML required to generate this form by hand. So instead, I wrote an HTML helper class to generate the form for me.

Model

Here is the data model we are going to be working with in this example.

public class Person
{
    public string Name { get; set; }
    public int Age { get; set; }
    public Address Address{ get; set; }
    public Gender Gender { get; set; }
}

public class Address
{
    public string Address1 { get; set; }
    public string Address2 { get; set; }
    public string City { get; set; }
    public string State { get; set; }
}

public enum Gender
{
    Male,
    Female
}

Goal

The goal here is to have a View that needs only call this helper to generate the textboxes and dropdown lists used for entering data. This way we avoid manually typing all of those angle brackets. So our View will look something like…


<h2>Dynamic Form</h2>

<%= Html.ValidationSummary("Create was unsuccessful. Please correct the errors and try again.") %>

<% using (Html.BeginForm()) {%>

<%= Html.DynamicInputs(Model, "Enter Person Information", string.Empty) %>

<p>
    <input type="submit" value="Submit" />
</p>

<% } %>


Dynamic Input Helper

The DynamicInputHelper will enumerate the data model properties and output forms elements responsible for receiving input from the user based on the data type. This is pretty simple.


public static class DynamicFormHelper
{
    public static string DynamicInputs<T>(this HtmlHelper helper, T obj, string heading, string prefix)
        where T : class
    {

        // Contruct id for model binding
        if (!string.IsNullOrEmpty(prefix))
            prefix += ".";

        // Make sure we have an instance of the obj
        if (obj == null)
            obj = (T)Activator.CreateInstance(typeof(T));

        var type = obj.GetType();

        var sb = new StringBuilder().Append("<fieldset>");

        sb.AppendFormat("<legend>{0}</legend>", heading);

        foreach (var propertyInfo in type.GetProperties())
        {
            if ((propertyInfo.PropertyType.IsValueType && !propertyInfo.PropertyType.IsEnum) || propertyInfo.PropertyType.FullName == typeof(string).FullName)
            {
                sb.AppendFormat(
                    "<p><label for=\"{0}\">{1}:</label>" +
                    "<input type=\"text\" id=\"{0}\" name=\"{0}\" value=\"{2}\"></p>",
                    prefix + propertyInfo.Name,
                    propertyInfo.Name.SpaceCamelCase(),
                    propertyInfo.GetValue(obj, null));
            }
            else if (propertyInfo.PropertyType.IsEnum)
            {
                sb.AppendFormat("<p><label for=\"{0}\">{0}:</label>", propertyInfo.PropertyType.Name.SpaceCamelCase());
                
                sb.Append(
                    helper.SelectFromEnum(propertyInfo.PropertyType,
                    prefix + propertyInfo.PropertyType.Name.SpaceCamelCase()));

                sb.Append("</p>");
            }
            else
            {

                var child = Convert.ChangeType(propertyInfo.GetValue(obj, null) ??
                    Activator.CreateInstance(propertyInfo.PropertyType), propertyInfo.PropertyType);

                sb.AppendFormat(
                    helper.DynamicInputs(child, propertyInfo.Name, prefix + propertyInfo.Name)
                    );
            }
        }

        sb.Append("</fieldset>");
        return sb.ToString();
    }

    public static string SelectFromEnum(this HtmlHelper helper, Type type, string name)
    {
        var sb = new StringBuilder();

        sb.AppendFormat("<select id=\"{0}\" name=\"{0}\">", name);


        foreach (var e in Enum.GetNames(type))
        {
            sb.AppendFormat("<option value=\"{0}\">{1}</option>", (int) Enum.Parse(type, e, true), e.SpaceCamelCase());
        }

        sb.Append("</select>");

        return sb.ToString();
    }

    public static string SpaceCamelCase(this string camelCase)
    {
        if (camelCase == null)
            throw new ArgumentException("Null is not allowed for StringUtils.FromCamelCase");

        var sb = new StringBuilder(camelCase.Length + 10);
        bool first = true;
        char lastChar = '\0';

        foreach (char ch in camelCase)
        {
            if (!first &&
                 (char.IsUpper(ch) ||
                   char.IsDigit(ch) && !char.IsDigit(lastChar)))
                sb.Append(' ');

            sb.Append(ch);
            first = false;
            lastChar = ch;
        }

        return sb.ToString(); ;
    } 
}
 

Finished Product

If all goes according to plan you should end up with a finished product that looks something like this. The coolest part about this form is that it is rendered so the Model Binder will know how to construct the object on the server when the request is received.

tmpE18B


Update 9/30/2009: As pointed out in the comments below, check out Input Builders MvcContrib for a more complete and robust solution for your form generation needs.

How to identify slow running queries in Sql Server

Recently, I was trying to pin point the queries in an application that were causing Sql Server to spike the CPU at 100%. This query was helpful in finding the top offenders.

SELECT  creation_time
        ,last_execution_time
        ,total_physical_reads
        ,total_logical_reads
        ,total_logical_writes
        ,execution_count
        ,total_worker_time
        ,total_elapsed_time
        ,total_elapsed_time / execution_count avg_elapsed_time
        ,SUBSTRING(st.text, (qs.statement_start_offset/2) + 1
        ,((CASE statement_end_offset
          WHEN -1 THEN DATALENGTH(st.text)
          ELSE qs.statement_end_offset END
          - qs.statement_start_offset)/2) + 1) AS statement_text
FROM sys.dm_exec_query_stats AS qs
CROSS APPLY sys.dm_exec_sql_text(qs.sql_handle) st
ORDER BY total_elapsed_time / execution_count DESC;


See this post for more information.

Custom SolutionRoot in TFSBuild

So I’m working through an issue trying to copy the build results from the local build location on the build machine to the drop location. I need to to do this manually because I need my solution to be built exactly the way it is built from the IDE, to keep file references in tact. This should be simple, right? Wrong. It seems that the $(SolutionRoot) property is not set to the value of Local Folder in your build definition. The value for $(SolutionRoot) does not seem to affected by customizing this value.

A simple work around to this is to use the $(Solution) property instead, it actually provides the location of the sln file itself. So with a bit of manipulation we can gather our real solution root location. Here is an example of how we can manipulate the value provided by $(Solution) to get the actual solution root.

<Target Name="AfterCompileSolution">
    <ItemGroup>
        <SolutionOutputs Include="$(Solution)\..\**\*.*" />
    </ItemGroup>

    <Copy SourceFiles="@(SolutionOutputs)" DestinationFolder="$(DropLocation)\$(BuildNumber)\%(Directory)%(RecursiveDir)" ContinueOnError="true" />
</Target>

Using MySQL with Entity Framework and ASP.NET MVC – Part II

I am going to wrap up this two part series on using MySQL with Entity Framework. Below is a link to the initial installment.

Using MySQL with Entity Framework and ASP.NET MVC – Part I

In Part I, we created a database schema in MySQL, generated a data model using Entity Framework, and wrapped the model using a simple repository pattern. We will now walk through using those repositories to access and modify our data.

Extending our repositories data model

Due to the fact that the default MySQL database engine does not support foreign keys, there is no relationship between the two entities generated by Entity Framework. After a frustrating experience trying to manually add the association for Product->Category using the EF designer, I decided to add it manually by extending the generated partial class. This will allow us to easily access the category to which a product belongs.

 public partial class Product
 {
     private Category _category;

     public Category Category
     {
         get
         {
             if (_category == null)
            {
                var categoryRepository = new CategoryRepository();

                var cat = categoryRepository.Select(categoryid);

                _category = cat.First();
            }

            return _category;
        }
    }          
}
 

Using the MVC pattern

If you are unfamiliar with MVC pattern, I suggest you check this out for a little background. Also, information specifically concerning ASP.NET MVC can be found here.

We have already fulfilled the “M” in MVC by generating our model using Entity Framework. These objects will serve as a strongly typed data model for the database we wish to access. The next step is to define the behavior of our sample application. This will be done in our Controller objects, the “C” in MVC.

Working with ASP.NET MVC

When we created our new ASP.NET MVC project, a few folders were created automatically. As we have seen already, a Models folder was created and can be used to store the code files representing our data model. To create our Controllers, we are going to right-click on the Controllers folder and select Add->Controller… Here we will create a new controller named ProductController and tick the option to automatically generate Create, Update, and Delete stubs. (Note: We are going to use the default routing table that ships with ASP.NET MVC. This can be edited in Global.asax.cs)

tmpD5C8

Listing our data

To generate a list of our data we are going to place the following data fetching code into the Index method stub of our Controller and pass the results to a View.

//
// GET: /Product/

public ActionResult Index()
{
    ProductRepository productRepository = new ProductRepository();

    return View(productRepository.Select().ToList());
}
 

Now, we create the view to display this data. Locate the Views folder that was created by the ASP.NET MVC project template and add a subfolder with the name Product. Notice that this folder’s name matches that of the prefix of our controller. This is by design. ASP.NET MVC provides this convention to make our lives a bit easier (CoC). The ASP.NET MVC framework will first look for the subfolder that matches your controller. If it is not found, it will then look in the Shared subfolder. Now, right-click the Product folder and select Add->View… Enter the view name Index, select to create a strongly-typed view, select the appropriate data model class, and select List from the view content drop down.

 tmpB031

Take a look a the newly created View. There is code already generated for viewing a list of our object. This is convenient, but we are going to modify it slightly to display the data in a more meaningful manner.

<% foreach (var item in Model) { %>

  <tr>
      <td>
          <%= Html.ActionLink("Edit", "Edit", new { id=item.id }) %> |
          <%= Html.ActionLink("Details", "Details", new { id=item.id })%>
      </td>
      <td>
          <%= Html.Encode(item.Category.name) %>
      </td>
      <td>
          <%= Html.Encode(item.id) %>
      </td>
      <td>
          <%= Html.Encode(item.name) %>
      </td>
  </tr>

<% } %>
 

Notice that we are accessing the Category property of the Product object. This was made possible by extending the Product partial class to include this property. When we run this we should see a listing of our products. (Note: Database backup with test data is included with source download.)

tmp98BC


Adding and Editing data

For the case of adding and editing our data, we are going to add two controller methods. The first will process the http GET command and return the View used for adding or editing our data. The second will process the http POST command. This overloaded method will be marked with a special attribute to designate that it is responsible for handling POSTs for this action. So for adding data we must specify our Create methods.

//
// GET: /Product/Create

public ActionResult Create()
{
   return View();
} 

//
// POST: /Product/Create

[AcceptVerbs(HttpVerbs.Post)]
public ActionResult Create(FormCollection formCollection)
{
  try
  {
      Product product = new Product();
      TryUpdateModel(product);

      var productRepo = new ProductRepository();
      productRepo.Add(product);
      productRepo.Save();

      return RedirectToAction("Index");
  }
  catch
  {
       return View();
  }
}
 

And for editing our data will provide Edit methods.

public ActionResult Edit(int id)
{           
  var productRepo = new ProductRepository();
  var product = productRepo.Select(id);

  return View(product);
}

//
// POST: /Product/Edit/5

[AcceptVerbs(HttpVerbs.Post)]
public ActionResult Edit(int id, FormCollection collection)
{
  try
  {
      var productRepo = new ProductRepository();
      var product = productRepo.Select(id);

      TryUpdateModel(product);

      productRepo.Save();

      return RedirectToAction("Index");
  }
  catch
  {
      return View();
  }
}
 

Notice that the Edit implementation responsible for handling GETs differs from our Create GET implementation. It must fetch the item that we will be editing and hand it off to the view. There is one more step before we are ready to create our Views. For the sake of user friendliness we are going to provide a drop down list to allow the user to select the category by name instead of requiring them to input a Category id. To accomplish this we must fetch the collection of Categories and make it available to the View. For simplicities sake, we will do this in the Controller’s constructor.

 
public ProductController() : base()
{
      var categoryRepo = new CategoryRepository();
      ViewData["categories"] = categoryRepo.Select().ToList();
}
 

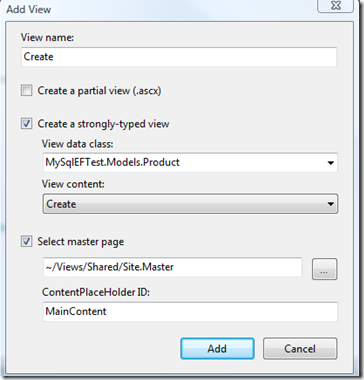
Now we are ready create our Views. Just like with the Create View we will right-click on the Product subfolder in the View folder and select Add->View…
tmpE357

tmp8928

Again, we will edit the generated code for the Views to enhance the user experience.

 <% using (Html.BeginForm()) {%>

     <fieldset>
         <legend>Fields</legend>
         <p>
              <label for="Category">Category:</label>
             <%= Html.DropDownList("categoryid", new SelectList((IEnumerable)ViewData["categories"], "id", "name")) %>
             <%= Html.ValidationMessage("categoryid", "*") %>
         </p>
        <p>
            <label for="name">Name:</label>
            <%= Html.TextBox("name") %>
            <%= Html.ValidationMessage("name", "*") %>
        </p>
        <p>
            <input type="submit" value="Create" />
        </p>
    </fieldset>

<% } %>


And…

<% using (Html.BeginForm()) {%>

     <fieldset>
         <legend>Fields</legend>
         <p>
             <label for="id">ID:</label>
             <%= Html.Encode(Model.id) %>
             
         </p>
        <p>
            <label for="category">Category:</label>
            <%= Html.DropDownList("categoryid", new SelectList((IEnumerable)ViewData["categories"], "id", "name")) %>
            <%= Html.ValidationMessage("categoryid", "*") %>
        </p>
        <p>
            <label for="name">Name:</label>
            <%= Html.TextBox("name", Model.name) %>
            <%= Html.ValidationMessage("name", "*") %>
        </p>
        <p>
            <input type="submit" value="Save" />
        </p>
    </fieldset>

<% } %>

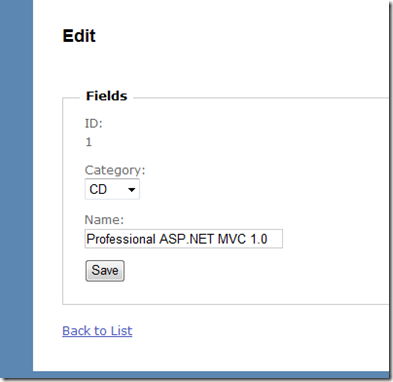
This will produce pages that allow the user to easily create and edit data.
tmp5C11

That’s it. Now you are ready to rock with MySQL, Entity Framework, and ASP.NET MVC!

What about our test project?

Remember in Part I when I asked you to create a test project along with our ASP.NET MVC application? I have decided to leave unit tests out of this series for the sake of simplicity and the fact that Visual Studio Test Projects are only supported in the Professional version of Visual Studio. In a future post I will cover writing unit tests for ASP.NET MVC projects using an open source unit test framework like nUnit or mbUnit. At that time, I will attempt to demonstrate developing our sample project following a Test Driven Development technique.

Summary

We were able to easily to generate a data model for a MySQL database schema using Entity Framework.

We were able to access our data model from an ASP.NET MVC project. We created strongly typed Views that allowed us dictate exactly how we wanted our pages to render for simple CRUD scenarios.

For more advanced scenarios using ASP.NET MVC, such as adding validation to your data model and securing your application, check out the free NerdDinner ASP.NET MVC Tutorial.


Download File – Source

Using MySQL with Entity Framework and ASP.NET MVC – Part I

I would like to take a look at creating an object model for a MySQL database schema in .NET and accessing that data with LINQ queries.

After some research on the subject I figured the path of least resistance would be to try out Microsoft’s latest data access technology, Entity Framework. Now, I know people are not thrilled with some of the apparent short comings of EF – friend’s don’t let friend’s use EF, but still we march on.

Prerequisites

Also, I am using ASP.NET MVC as our test harness so you will also need the ASP.NET MVC Framework installed along side Visual Studio. You can download that here. If you are unfamiliar with ASP.NET MVC, I suggest you get with the program.

Getting Started

I am going to assume that you are able to get the MySQL database engine along with the GUI tools installed. If not, read more here.

Once you have your MySQL database up and running open the MySQL Administrator. Fill in your connection information and credentials and select Ok.

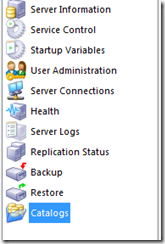
Next, we are going to select the Catalogs icon and create a new schema (or database for SQL Server people). Right-click in the Schemata list and select Create New Schema.

tmp1867

Enter your new schema name and select Ok.

tmpB89E

Open the MySQL Query Browser from the Tools menu. Open and New Script Tab from the File menu and run the following scripts. This will create two tables. (note: we’re using the default MyISAM database engine)

CREATE TABLE  `demotest`.`category` (

  `id` int(10) unsigned NOT NULL AUTO_INCREMENT,

  `name` varchar(45) NOT NULL,

  PRIMARY KEY (`id`)

) ENGINE=MyISAM AUTO_INCREMENT=2 DEFAULT CHARSET=latin1;

DROP TABLE IF EXISTS `demotest`.`product`;

CREATE TABLE  `demotest`.`product` (

  `id` int(10) unsigned NOT NULL AUTO_INCREMENT,

  `name` varchar(45) NOT NULL,

  `categoryid` varchar(45) NOT NULL,

  PRIMARY KEY (`id`)

) ENGINE=MyISAM AUTO_INCREMENT=2 DEFAULT CHARSET=latin1;

Now, in Visual Studio create a new ASP.NET MVC Web Application. Select, Yes to create a Unit Test project along side the web application. We may use this later.

tmpF6A8

Next, in your Visual Studio Server Explorer create a new data connection. Change your data source to MySQL and enter your database information.

tmp5A7A

Notice you can now access your MySQL database from the Server explorer.

tmp6D96

The next step is to add the Entity Framework model to our project. Right-Click on the Model folder that is created by the ASP.NET MVC project template and select Add New Item. Locate the ADO.NET Entity Data Model option and press Ok.

tmpAEC3

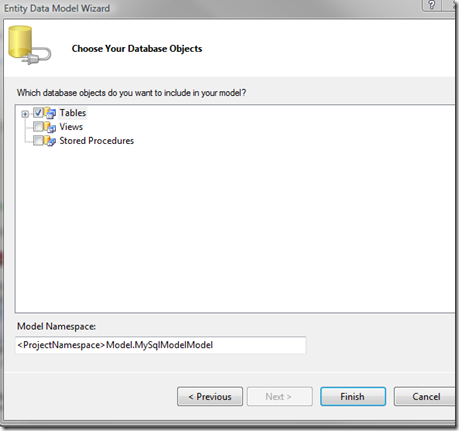
Select the Generate from database option and click Next. Select, Yes to putting your connection string information in your web.config. This might not be the best option for your “real world” apps but it is just fine for us. Now select the option to generate objects for our tables and input your Model’s namespace.

tmp4C6A

Select Finish and the EF magic happens.

tmpE92C

Now that our EF model has been generated we are going to wrap that in a simple repository pattern. Here is what the repository type will look like for Products.

public class ProductRepository
{

    MySqlEntities mySqlEntities = new MySqlEntities();

    public IQueryable<Product> Select()

    {

        var result = from p in mySqlEntities.ProductSet

                     select p;

        return result;

    }

    public IQueryable<Product> Select(int id)

    {

        var result = from p in Select()

                     where p.id == id

                     select p;

        return result;

    }

    public void Add(Product product)

    {

        mySqlEntities.AddToProductSet(product);

    }

    public void Delete(Product product)

    {

        mySqlEntities.DeleteObject(product);

    }

    public void Save()

    {

        mySqlEntities.SaveChanges();

    }
}

We will do the same for Categories…

public class CategoryRepository
{

    MySqlEntities mySqlEntities = new MySqlEntities();

    public IQueryable<Category> Select()

    {

        var result = from p in mySqlEntities.CategorySet1

                     select p;

        return result;

    }

    public IQueryable<Category> Select(int id)

    {

        var result = from p in Select()

                     where p.id == id

                     select p;

        return result;

    }

    public void Add(Category category)

    {

        mySqlEntities.AddToCategorySet1(category);

    }

    public void Delete(Category category)

    {

        mySqlEntities.DeleteObject(category);

    }

    public void Save()

    {

        mySqlEntities.SaveChanges();

    }

}


So far…

We have created our database schema in MySQL using the MySQL GUI Tools. In Visual Studio, we added a connection to our database in the Server Explorer. We generated a Entity Framework object model for or database schema, and wrapped that model with repositories.

Next time we will use those repositories to access and modify our data from ASP.NET MVC controllers. Also, we will add views to round out our demo with a simple user interface for Add, Edit, and Create scenarios.

Source

Download File – Source