I am going to wrap up this two part series on using MySQL with Entity Framework. Below is a link to the initial installment.
Using MySQL with Entity Framework and ASP.NET MVC – Part I
In Part I, we created a database schema in MySQL, generated a data model using Entity Framework, and wrapped the model using a simple repository pattern. We will now walk through using those repositories to access and modify our data.
Extending our repositories data model
Due to the fact that the default MySQL database engine does not support foreign keys, there is no relationship between the two entities generated by Entity Framework. After a frustrating experience trying to manually add the association for Product->Category using the EF designer, I decided to add it manually by extending the generated partial class. This will allow us to easily access the category to which a product belongs.
 public partial class Product
 {
     private Category _category;

     public Category Category
     {
         get
         {
             if (_category == null)
            {
                var categoryRepository = new CategoryRepository();

                var cat = categoryRepository.Select(categoryid);

                _category = cat.First();
            }

            return _category;
        }
    }
}
Using the MVC pattern
If you are unfamiliar with MVC pattern, I suggest you check this out for a little background. Also, information specifically concerning ASP.NET MVC can be found here.
We have already fulfilled the “M” in MVC by generating our model using Entity Framework. These objects will serve as a strongly typed data model for the database we wish to access. The next step is to define the behavior of our sample application. This will be done in our Controller objects, the “C” in MVC.
Working with ASP.NET MVC
When we created our new ASP.NET MVC project, a few folders were created automatically. As we have seen already, a Models folder was created and can be used to store the code files representing our data model. To create our Controllers, we are going to right-click on the Controllers folder and select Add->Controller… Here we will create a new controller named ProductController and tick the option to automatically generate Create, Update, and Delete stubs. (Note: We are going to use the default routing table that ships with ASP.NET MVC. This can be edited in Global.asax.cs)

Listing our data
To generate a list of our data we are going to place the following data fetching code into the Index method stub of our Controller and pass the results to a View.
//
// GET: /Product/

public ActionResult Index()
{
    ProductRepository productRepository = new ProductRepository();

    return View(productRepository.Select().ToList());
}
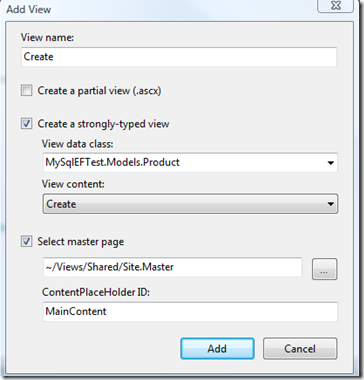
Now, we create the view to display this data. Locate the Views folder that was created by the ASP.NET MVC project template and add a subfolder with the name Product. Notice that this folder’s name matches that of the prefix of our controller. This is by design. ASP.NET MVC provides this convention to make our lives a bit easier (CoC). The ASP.NET MVC framework will first look for the subfolder that matches your controller. If it is not found, it will then look in the Shared subfolder. Now, right-click the Product folder and select Add->View… Enter the view name Index, select to create a strongly-typed view, select the appropriate data model class, and select List from the view content drop down.

Take a look a the newly created View. There is code already generated for viewing a list of our object. This is convenient, but we are going to modify it slightly to display the data in a more meaningful manner.
<% foreach (var item in Model) { %>

  <tr>
      <td>
          <%= Html.ActionLink("Edit", "Edit", new { id=item.id }) %> |
          <%= Html.ActionLink("Details", "Details", new { id=item.id })%>
      </td>
      <td>
          <%= Html.Encode(item.Category.name) %>
      </td>
      <td>
          <%= Html.Encode(item.id) %>
      </td>
      <td>
          <%= Html.Encode(item.name) %>
      </td>
  </tr>

<% } %>
Notice that we are accessing the Category property of the Product object. This was made possible by extending the Product partial class to include this property. When we run this we should see a listing of our products. (Note: Database backup with test data is included with source download.)

Adding and Editing data
For the case of adding and editing our data, we are going to add two controller methods. The first will process the http GET command and return the View used for adding or editing our data. The second will process the http POST command. This overloaded method will be marked with a special attribute to designate that it is responsible for handling POSTs for this action. So for adding data we must specify our Create methods.
//
// GET: /Product/Create

public ActionResult Create()
{
   return View();
}

//
// POST: /Product/Create

[AcceptVerbs(HttpVerbs.Post)]
public ActionResult Create(FormCollection formCollection)
{
  try
  {
      Product product = new Product();
      TryUpdateModel(product);

      var productRepo = new ProductRepository();
      productRepo.Add(product);
      productRepo.Save();

      return RedirectToAction("Index");
  }
  catch
  {
       return View();
  }
}
And for editing our data will provide Edit methods.
public ActionResult Edit(int id)
{
  var productRepo = new ProductRepository();
  var product = productRepo.Select(id);

  return View(product);
}

//
// POST: /Product/Edit/5

[AcceptVerbs(HttpVerbs.Post)]
public ActionResult Edit(int id, FormCollection collection)
{
  try
  {
      var productRepo = new ProductRepository();
      var product = productRepo.Select(id);

      TryUpdateModel(product);

      productRepo.Save();

      return RedirectToAction("Index");
  }
  catch
  {
      return View();
  }
}
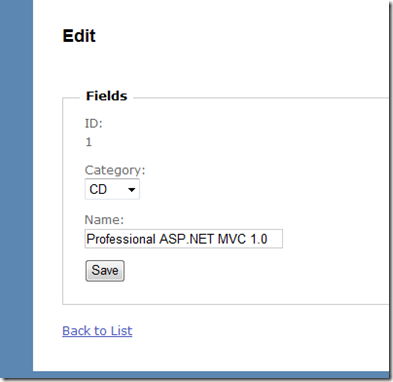
Notice that the Edit implementation responsible for handling GETs differs from our Create GET implementation. It must fetch the item that we will be editing and hand it off to the view. There is one more step before we are ready to create our Views. For the sake of user friendliness we are going to provide a drop down list to allow the user to select the category by name instead of requiring them to input a Category id. To accomplish this we must fetch the collection of Categories and make it available to the View. For simplicities sake, we will do this in the Controller’s constructor.
public ProductController() : base()
{
      var categoryRepo = new CategoryRepository();
      ViewData["categories"] = categoryRepo.Select().ToList();
}
Now we are ready create our Views. Just like with the Create View we will right-click on the Product subfolder in the View folder and select Add->View…


Again, we will edit the generated code for the Views to enhance the user experience.
 <% using (Html.BeginForm()) {%>

     <fieldset>
         <legend>Fields</legend>
         <p>
              <label for="Category">Category:</label>
             <%= Html.DropDownList("categoryid", new SelectList((IEnumerable)ViewData["categories"], "id", "name")) %>
             <%= Html.ValidationMessage("categoryid", "*") %>
         </p>
        <p>
            <label for="name">Name:</label>
            <%= Html.TextBox("name") %>
            <%= Html.ValidationMessage("name", "*") %>
        </p>
        <p>
            <input type="submit" value="Create" />
        </p>
    </fieldset>

<% } %>
And…
<% using (Html.BeginForm()) {%>

     <fieldset>
         <legend>Fields</legend>
         <p>
             <label for="id">ID:</label>
             <%= Html.Encode(Model.id) %>

         </p>
        <p>
            <label for="category">Category:</label>
            <%= Html.DropDownList("categoryid", new SelectList((IEnumerable)ViewData["categories"], "id", "name")) %>
            <%= Html.ValidationMessage("categoryid", "*") %>
        </p>
        <p>
            <label for="name">Name:</label>
            <%= Html.TextBox("name", Model.name) %>
            <%= Html.ValidationMessage("name", "*") %>
        </p>
        <p>
            <input type="submit" value="Save" />
        </p>
    </fieldset>

<% } %>
This will produce pages that allow the user to easily create and edit data.

That’s it. Now you are ready to rock with MySQL, Entity Framework, and ASP.NET MVC!
What about our test project?
Remember in Part I when I asked you to create a test project along with our ASP.NET MVC application? I have decided to leave unit tests out of this series for the sake of simplicity and the fact that Visual Studio Test Projects are only supported in the Professional version of Visual Studio. In a future post I will cover writing unit tests for ASP.NET MVC projects using an open source unit test framework like nUnit or mbUnit. At that time, I will attempt to demonstrate developing our sample project following a Test Driven Development technique.
Summary
We were able to easily to generate a data model for a MySQL database schema using Entity Framework.
We were able to access our data model from an ASP.NET MVC project. We created strongly typed Views that allowed us dictate exactly how we wanted our pages to render for simple CRUD scenarios.
For more advanced scenarios using ASP.NET MVC, such as adding validation to your data model and securing your application, check out the free NerdDinner ASP.NET MVC Tutorial.


